Free Crochet Beach Cover Up Pattern — South Beach Style in Golden Lace (Sizes S–L)
Picture this: It’s a golden afternoon, your sunscreen is on, and you’re slipping the most stunning golden lace cover up over your swimsuit before heading down to the water. People stop and stare. Someone asks where you bought it. And you get to smile and say — I made it.
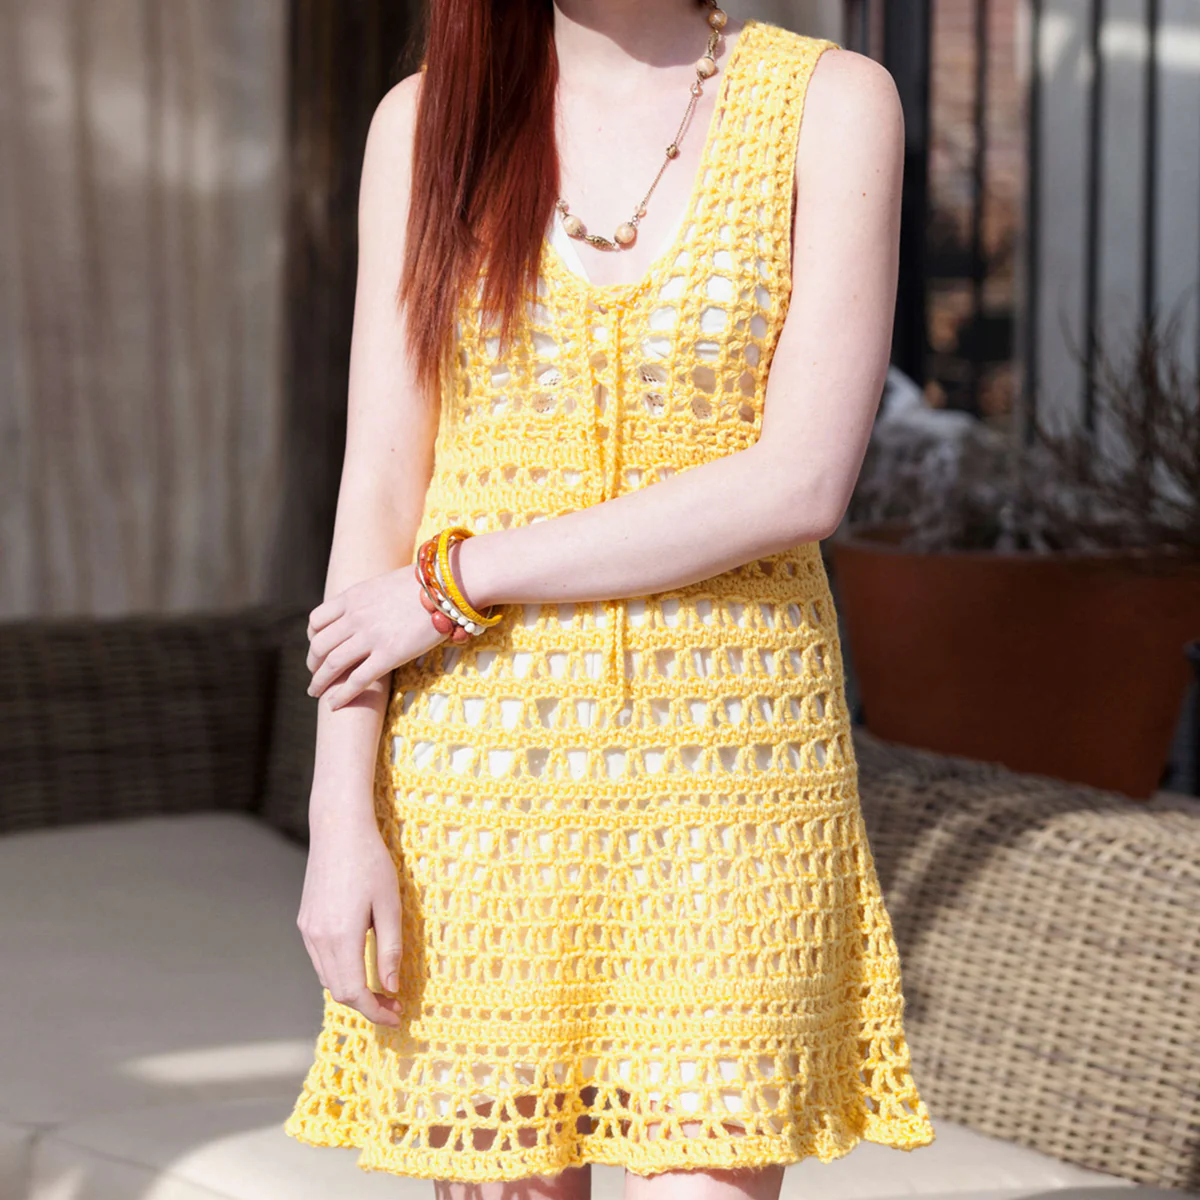
That’s the South Beach Cover Up, and it is every bit as dreamy as it sounds.
This free crochet beach cover up pattern was inspired by a style spotted on a Hollywood actress, and honestly? It shows. The airy lace bodice, the flowing skirt with a flirty ruffle hem, and the adjustable drawstring tie at the front make this piece feel like something you’d find in a boutique — not on your hook. But here it is, on your hook, waiting for you.
It’s worked in a gorgeous buttercup yellow bamboo blend yarn that drapes like a dream, and it comes in three sizes (Small, Medium, and Large) so you can make one that fits you perfectly.
By the end of this post, you’ll have everything you need to make this yourself — even if V-stitches still feel a little mysterious.
Why You’ll Love This Pattern
- 🌊 Wearable beyond the beach — style it over a tee shirt dress, tank and leggings, or skinny jeans for an effortlessly chic everyday look
- 🎁 Perfect for gifting — this is the kind of project that makes someone cry (the happy kind). Great for birthdays, Mother’s Day, or a summer hostess gift
- 🏖️ Three sizes included — Small (36″ bust), Medium (41″), and Large (46″), so you can crochet for yourself and your best friend
- 🌿 Beautiful bamboo yarn — the Bamboo Ewe yarn gives the finished piece a luxurious drape and a subtle sheen that photographs beautifully
- ✨ Stunning lace texture — V-stitches, Tr-V-stitches, and eyelet rounds create a gorgeous open-weave fabric that’s breezy and elegant
- ⏱️ A satisfying weekend warrior project — rated intermediate, this is a wonderful next step if you’re comfortable with basic stitches and ready to level up
[LINK: best summer crochet projects roundup]
Materials & Tools You’ll Need
Yarn:
- ☑ STITCH NATION by Debbie Stoller “Bamboo Ewe” — Color 5230 Buttercup
- Small: 4 balls | Medium: 5 balls | Large: 6 balls
- Each ball: 3.5 oz (100g) / 177 yd (162m)
- Substitution note: Look for a medium-weight (size 4) yarn with a bamboo or bamboo-cotton blend for that signature drape. Paintbox Yarns Simply DK or Lion Brand Nature’s Choice Organic Cotton are good alternatives, though drape and gauge may vary.
Hooks:
- ☑ 6 mm / US J-10 crochet hook (smaller hook — used for the body)
- ☑ 6.5 mm / US K-10½ crochet hook (larger hook — used for the ruffle)
Other Supplies:
- ☑ Yarn needle (for weaving in ends)
💡 Gauge Matters! With the smaller (6mm / J-10) hook: 12 stitches and 4 rows of double crochet = 4 inches; 1 row dc + 1 row treble crochet = 1¾ inches. Please check your gauge before starting — this is especially important for garments! [LINK: how to check your gauge guide]
Abbreviations & Stitch Guide
Here’s every abbreviation you’ll see in this pattern, spelled out clearly. Don’t skip this section — a couple of these stitches are the key to that gorgeous lace look!
| Abbreviation | Meaning |
|---|---|
| ch | chain |
| sc | single crochet |
| hdc | half double crochet |
| dc | double crochet |
| tr | treble (triple) crochet |
| sl st | slip stitch |
| st(s) | stitch(es) |
| mm | millimeters |
| [ ] | work the directions in brackets the number of times specified |
| * | repeat whatever follows the asterisk as indicated |
Special Stitches — These Are the Stars of the Show!
V-st (V-Stitch): Work (dc, ch 1, dc) all in the same stitch or space. This creates the classic open “V” shape that gives the bodice its beautiful lace pattern. Think of it as a little gateway arch.
Tr-V-st (Treble V-Stitch): Work (tr, ch 1, tr) all in the same stitch or space. Just like the V-st, but taller — this one shows up in the skirt and ruffle and creates a slightly more dramatic, open lace effect.
💡 New to treble crochet? A treble crochet is just like a double crochet, but you yarn over twice before inserting your hook (instead of once). It creates a taller stitch. [LINK: beginner crochet tips post]
Step-by-Step Pattern Instructions
The cover up is worked in four separate pieces — Left Back, Right Back, Right Front, and Left Front — then seamed together before you add the Skirt in the round. The drawstring is crocheted separately and threaded through at the end. It sounds like a lot, but each piece follows a similar rhythm — and once you’ve made one, the rest will feel much more familiar!
Directions are written for size Small. Changes for Medium and Large are given in parentheses, like this: Small (Medium, Large). When you see a single number, it applies to all sizes.
Part 1: Left Back
Starting at the left side, chain 15.
Step 1 (Wrong Side — Row 1): Single crochet in the 2nd chain from your hook and in each chain across. Turn. — [14 sc]
Step 2 (Right Side — Row 2): Chain 3 (this counts as your first dc, here and throughout the pattern). Skip the first 2 sc. *Work a V-st in the next sc, skip the next 2 sc; repeat from * twice more. Work a V-st in the next sc, skip the next sc, dc in the last sc. Turn. — [4 V-sts]
Step 3 (Row 3): Chain 4 (counts as dc + ch 1). Work (dc, ch 2) in each of the next 3 ch-1 spaces. Dc in the last ch-1 space, ch 1, dc in the top of the turning chain. Turn.
📏 Size Large Only: Repeat Rows 2–3 one more time (Rows 4–5) before moving on to Shape Armhole.
Shape Armhole — Left Back
Step 4 (Armhole Row 1): Ch 3, skip the next ch-1 space, V-st in each of the next 4 dc, dc in the 3rd ch of the turning chain. Now chain 28 (31, 34). Turn. (This chain extends the piece to create the sleeve opening.)
Step 5 (Armhole Row 2): Sc in the 2nd ch from your hook and in each of the next 26 (29, 32) ch sts. Then sc in each stitch and each ch-1 space across, ending with sc in the 3rd ch of the turning chain. Turn. — [41 (44, 47) sc]
💡 Pro Tip: Count your stitches here! Row 2 of the armhole shaping is where a lot of crocheters lose track. Take a moment to count all the way across — catching a mistake here saves you from ripping back rows later.
Step 6 (Armhole Row 3): Ch 3, skip the first 2 sts. *V-st in the next st, skip the next sts; repeat from * across to the last 2 sts. Skip the next st, dc in the last st. Turn. — [13 (14, 15) V-sts]
Step 7 (Armhole Row 4): Ch 4 (counts as dc, ch 1). Work (dc, ch 2) in each ch-1 space across to the last ch-1 space. Dc in the last ch-1 space, ch 1, dc in the top of the turning chain. Turn. — [12 (13, 14) ch-2 spaces]
Step 8 (Armhole Rows 5–8): Repeat Rows 3–4 of the Armhole two more times (4 rows total).
Step 9 (Armhole Row 9): Ch 3, skip the first 2 sts. *V-st in the next dc, skip the next ch-2 space; repeat from * 8 (9, 10) times. Dc in the next dc. Turn. — [9 (10, 11) V-sts]
Step 10 (Armhole Row 10): Ch 4 (counts as dc, ch 1). Work (dc, ch 2) in each ch-1 space across to the last ch-1 space. Dc in the last ch-1 space, ch 1, dc in the top of the turning chain. Turn. — [8 (9, 10) ch-2 spaces]
Step 11 (Armhole Rows 11–13 [15, 17]): Repeat Rows 9–10 of the Armhole 1 (2, 3) times, then repeat Row 9 once more. Fasten off.
💡 Pro Tip: Those final row counts — 13, 15, or 17 — depend on your size. Small finishes at Row 13; Medium at Row 15; Large at Row 17. Write your size’s row count on a sticky note and keep it nearby!
Part 2: Right Back
Work the same as the Left Back through Row 3 (for S and M) or Row 5 (for L).
Shape Armhole — Right Back
Step 12 (Armhole Row 1): Ch 3, skip the next ch-1 space, V-st in each of the next 4 dc, dc in the 3rd ch of the turning chain. Turn. Drop your loop from the hook (don’t fasten off — just slip it off and keep it safe on a stitch marker or the tail of your hook).
Join a separate strand of yarn in the top of the first stitch in Row 1 of the Armhole Shaping and chain 27 (30, 33). Fasten off that separate strand.
Step 13 (Armhole Row 2): Pick up your dropped loop from the end of Row 1. Ch 1, sc in the first st, sc in each st and ch-1 space across, sc in each chain of the added chain. Turn. — [41 (44, 47) sc]
Steps 14–19 (Armhole Rows 3–8): Work the same as Rows 3–8 of the Left Back Armhole. Fasten off.
Step 20 (Armhole Row 9): With the right side facing you, skip the first 5 ch-2 spaces, join yarn in the next dc. Ch 3. *V-st in the next dc, skip the next ch-2 space; repeat from * 8 (9, 10) times. Dc in the last sc. Turn. — [9 (10, 11) V-sts]
Steps 21–24 (Armhole Rows 10–13 [15, 17]): Work the same as Rows 10–13 (15, 17) of the Left Back. Fasten off.
Part 3: Right Front
Work the same as the Left Back through Row 1 of Armhole Shaping.
Step 25 (Armhole Row 2): Sc in the 2nd ch from your hook and in each of the next 26 (29, 32) ch sts. Hdc in each st and each ch-1 space across, ending with sc in the 3rd ch of the turning chain. Turn. — [27 (30, 33) sc; 14 hdc]
What’s hdc? Half double crochet is between a sc and a dc in height. Yarn over, insert hook, yarn over and pull through, yarn over and pull through all 3 loops. The mix of hdc and sc on this row creates the subtle slope of the front neckline — clever design!
Step 26 (Armhole Row 3): Ch 3, skip the first 2 sts. *V-st in the next st, skip the next 2 sts; repeat from * across to the last 2 sts. Skip the next st, dc in the last st. Turn. — [13 (14, 15) V-sts]
Step 27 (Armhole Row 4): Ch 4 (counts as dc, ch 1). Work (dc, ch 2) in each of the next 8 (9, 10) ch-1 spaces. Work (tr, ch 2) in each remaining ch-1 space across to the last ch-1 space. Tr in the last ch-1 space, ch 1, tr in the top of the turning chain. Turn. — [12 (13, 14) ch-2 spaces; 9 (10, 11) dc; 6 tr]
The switch from dc to tr on this row creates the gentle diagonal of the front neckline — it’s a subtle but beautiful detail.
Step 28 (Armhole Rows 5–8): Repeat Rows 3–4 twice. (4 total rows)
💡 Pro Tip: Double-check that your V-sts are landing in the right place — always in a dc stitch, with the ch-2 space being skipped. If something looks off, this is the moment to catch it!
Step 29 (Armhole Row 9): Ch 3, skip the first 2 sts. *V-st in the next dc, skip the next ch-2 space; repeat from * 4 (5, 6) times. Dc in the next dc. Turn. — [5 (6, 7) V-sts]
Step 30 (Armhole Row 10): Ch 4 (counts as dc, ch 1). Work (dc, ch 2) in each ch-1 space across to the last ch-1 space. Dc in the last ch-1 space, ch 1, dc in the top of the turning chain. Turn. — [4 (5, 6) ch-2 spaces]
Step 31 (Armhole Row 11): Repeat Row 9. Fasten off (Size Small).
Sizes M and L Only — Rows 12–13: Repeat Rows 10–11 once. Fasten off.
Part 4: Left Front
Work the same as the Right Back through Row 1 of Armhole Shaping. Drop your loop from the hook.
Join a separate strand of yarn in the top of the first stitch in Row 1 of Armhole Shaping. Chain 27 (30, 33). Fasten off that strand.
Step 32 (Armhole Row 2): Pick up the dropped loop. Ch 2 (counts as hdc). Hdc in each stitch and ch-1 space across to the added chain. Sc in each chain across. Turn. — [27 (30, 33) sc; 14 hdc]
Step 33 (Armhole Row 3): Ch 3, skip the first 2 sts. *V-st in the next st, skip the next 2 sts; repeat from * across to the last 2 sts. Skip the next st, dc in the last st. Turn. — [13 (14, 15) V-sts]
Step 34 (Armhole Row 4): Ch 5 (counts as tr, ch 1). Work (tr, ch 2) in each of the next 5 ch-1 spaces. Work (dc, ch 2) in each remaining ch-1 space across to the last ch-1 space. Dc in the last ch-1 space, ch 1, dc in the top of the turning chain. Turn. — [12 (13, 14) ch-2 spaces; 9 (10, 11) dc; 6 tr]
Step 35 (Armhole Rows 5–8): Repeat Rows 3–4 twice. Fasten off.
Step 36 (Armhole Row 9): With the right side facing, skip the first 7 ch-2 spaces, join yarn in the next dc. Ch 3, skip next ch-2 space. *V-st in the next st, skip the next ch-2 space; repeat from * 4 (5, 6) times. Dc in the 4th ch of the turning chain. Turn. — [5 (6, 7) V-sts]
Step 37 (Armhole Row 10): Ch 4 (counts as dc, ch 1). Work (dc, ch 2) in each ch-1 space across to the last ch-1 space. Dc in the last ch-1 space, ch 1, dc in the top of the turning chain. Turn. — [4 (5, 6) ch-2 spaces]
Step 38 (Armhole Row 11): Repeat Row 3. Fasten off.
Sizes M and L Only — Rows 15–16: Repeat Rows 13–14 once. Fasten off.
Seaming the Bodice
With right sides facing, whipstitch the center back seam closed. Then whipstitch the Fronts to the Back at the sides and shoulders.
New to whipstitching? [LINK: how to whipstitch crochet seams tutorial] It’s easier than it sounds — you’re just sewing the edges together with your yarn needle, passing the yarn over the edge with each stitch.
Part 5: The Skirt
Now for the really fun part — the skirt is worked in the round, starting at the bottom of the joined bodice. Watch it grow!
Round 1: With the right side facing, join yarn at the bottom edge of the Back at the center seam. Ch 1. Work 35 (39, 43) sc evenly spaced across to the side seam. Work 35 (39, 43) sc evenly spaced across to the bottom of the Right Front. Work 35 (39, 43) sc evenly spaced across the bottom of the Left Front to the side seam. Work 35 (39, 43) sc evenly spaced across to the center back seam. Join with a slip stitch in the first sc. — [140 (156, 172) sc]
💡 Pro Tip: Placing stitch markers at each quarter point of this round makes it much easier to distribute your sc evenly. Aim for the same count in each section and you’ll be golden (pun absolutely intended).
Round 2 (Eyelet Round): Ch 4 (counts as dc, ch 1). Skip the first 2 sts. *Dc in the next sc, ch 1, skip the next sc; repeat from * around. Join with a sl st in the 3rd ch of the ch-4. — [70 (78, 86) ch-1 spaces]
This is the eyelet round — you’ll thread your drawstring through here later!
Round 3: Ch 3. Dc in each dc and ch-1 space around. Join with a slip stitch in the top of the turning chain.
Round 4: Ch 4, dc in the same st (this counts as a V-st). Ch 1, skip the next 3 sts. *V-st in the next st, ch 1, skip the next 3 sts; repeat from * around. Join with a sl st in the 3rd ch of the beginning ch-4. — [35 (39, 43) V-sts]
Round 5: Ch 3. Dc in each st and ch-1 space around. Join with a slip stitch in the top of the turning chain. — [140 (156, 172) dc]
Rounds 6–9: Repeat Rounds 4–5 twice more.
Round 10: Ch 5 (counts as tr, ch 1). Tr in the same st (this counts as a Tr-V-st). Skip the next 3 sts. *Tr-V-st in the next st, ch 1, skip the next 3 sts; repeat from * around. Join with a sl st in the 4th ch of the beginning ch-5. — [35 (39, 43) Tr-V-sts]
Notice the switch to treble crochet here — this adds extra height and starts flaring the skirt outward. Love it!
Round 11: Ch 2 (counts as hdc). Hdc in each st and ch-1 space around. Join with a sl st in the top of the turning chain.
Rounds 12–17: Repeat Rounds 10–11 three more times.
Round 18: Ch 4 (counts as dc, ch 1). Skip the first 2 sts. *Dc in the next st, ch 1, skip the next st; repeat from * around. Join with a sl st in the 3rd ch of the beginning ch-4.
Round 19: Ch 2 (counts as hdc). Hdc in each st and ch-1 space around to the last ch-1 space. Work 2 (1, 0) hdc in the last ch-1 space. Join with a sl st in the top of the turning chain. — [141 (156, 165) hdc]
Round 20: Ch 5 (counts as tr, ch 1). Tr in the same st (counts as Tr-V-st). Skip the next 2 sts. *Tr-V-st in the next st, skip the next 2 sts; repeat from * around. Join with a sl st in the 4th ch of the beginning ch-5. — [47 (52, 58) Tr-V-sts]
Round 21: Sl st in the next ch-1 space. Ch 5 (counts as tr, ch 1). Tr in the same space (counts as Tr-V-st). Tr-V-st in each of the next 2 ch-1 spaces. *(Tr, ch 1, tr, ch 1, tr) in the next ch-1 space. Tr-V-st in each of the next 3 ch-1 spaces; repeat from * 10 (11, 12) times.
- Sizes M and L Only: Work (tr, ch 1, tr, ch 1, tr) in the next ch-1 space.
- Size L Only: Tr-V-st in each of the next 2 ch-1 spaces.
- All sizes: Join with a sl st in the 4th ch of the beginning ch-5. — [58 (65, 72) ch-1 spaces]
Round 22: Sl st in the next ch-1 space. Ch 5 (counts as tr, ch 1). Tr in the same space (counts as Tr-V-st). Tr-V-st in each ch-1 space around. Join with a sl st in the 4th ch of the beginning ch-5. — [58 (65, 72) Tr-V-sts]
Round 23: Ch 3. Dc in each st and ch-1 space around, increasing 2 (1, 0) dc evenly spaced around. Join with a sl st in the top of the turning chain. — [176 (196, 216) dc]
Round 24: Ch 4 (counts as dc, ch 1). Skip the first 2 sts. *Dc in the next st, ch 1, skip the next st; repeat from * around. Join with a sl st in the 3rd ch of the beginning ch-4. — [88 (98, 108) ch-1 spaces]
Round 25: Ch 3. Dc in each st and ch-1 space around. Join with a sl st in the top of the turning chain. — [176 (196, 216) dc]
Round 26: Repeat Round 24.
Sizes M and L Only: Repeat Rounds 25–26 1 (2) more time(s).
💡 Pro Tip: You’re getting close to the ruffle — take a stitch count here to make sure you’re on track. The skirt should feel noticeably flared and airy at this point.
The Ruffle
Switch to your larger hook (6.5mm / K-10½) now! The bigger hook opens up the stitch work and gives the ruffle that lush, flouncy look.
Ruffle Rounds 1–3: Sl st in the next ch-1 space. Ch 5 (counts as tr, ch 1). Tr in the same space (counts as Tr-V-st). Ch 1, skip the next ch-1 space. *Tr-V-st in the next ch-1 space, ch 1, skip the next ch-1 space; repeat from * around. Join with a sl st in the 4th ch of the beginning ch-5. — [44 (49, 54) Tr-V-sts]
Ruffle Round 4: Ch 4 (counts as dc, ch 1). Skip the first st. Work (dc, ch 1) in each st and ch-1 space around. Join with a sl st in the 3rd ch of the beginning ch-4. — [176 (196, 216) ch-1 spaces]
Fasten off. Weave in all ends.
Finishing & Assembly
You made it through the hard part — now let’s make it wearable!
The Drawstring
Using the smaller hook (6mm / J-10), make a chain approximately 84 (90, 96) inches long. Fasten off. Tie an overhand knot at each end of the drawstring to stop it from pulling through.
Starting at the center back, weave one end of the drawstring through the eyelet round (Round 2 of the Skirt) on either side of the body toward the center front. Crisscross the ends and weave them through the eyelets along the front of each bodice panel. Pull the drawstring to adjust the fit, then tie it in a bow at the top of the front. That bow is everything.
Optional Armhole Trim
For a neater, slightly tighter armhole finish: With the smaller hook, join yarn at the bottom of one armhole. Ch 2, then hdc evenly all the way around the armhole. Join with a sl st in the top of the turning chain. Fasten off. Repeat for the second armhole.
Weaving In Ends
Thread your yarn needle with each tail and weave it securely into the wrong side of the fabric — go in different directions for a few stitches to lock it in place. Trim any excess.
Blocking (Optional but Recommended!)
Wet blocking this cover up will really help the lace open up and drape beautifully. Gently hand wash in cool water, press out the excess water in a towel (don’t wring!), then lay flat or hang to dry. You’ll be amazed at how the lace blossoms.
🎉 You did it! You just crocheted a genuine showstopper. Step back, hold it up, and take a moment to appreciate what your two hands made. It’s gorgeous. Now go show it off.
Styling & Usage Ideas
This cover up is one of those rare makes that earns its hanger space all year long. Here are a few ways to wear it:
- Beach day perfection: Slip it over your favorite swimsuit for instant resort-chic. The golden lace looks especially stunning against a navy or coral suit.
- Boho street style: Layer it over a white fitted tank and high-waisted cutoffs for a festival-ready look that’s completely you.
- Summer evening look: Pair with a slip dress underneath and wedge sandals for a breezy dinner-out outfit that’ll stop traffic.
- The best gift you’ll ever give: Wrap it in tissue paper with a handwritten tag that says “Made with love.” This is the kind of gift people talk about for years. [LINK: crochet gift ideas for her]
Save This Pattern — And Come Find Us!
If you’re already reaching for your yarn (and I know you are), make sure to save this post so you can find it again when you’re in the middle of a round and need to check the next step!
Here’s how to be part of our crochet community:
- 📌 Pin this post to your Crochet Patterns board so it’s always within reach
- 💬 Leave a comment below — I’d love to hear what color you’re making yours in! Are you going for the classic Buttercup yellow, or mixing it up with something unexpected?
- 📸 Share your finished cover up in the comments or tag us on Instagram — seeing your makes is the absolute best part of running this blog
- 💌 Subscribe to the newsletter for new free patterns, tutorials, and crochet inspo delivered straight to your inbox
Happy hooking, friend. This one’s going to be beautiful on you. 🌊☀️
Pattern originally designed by Ann Regis for Coats & Clark / Stitch Nation by Debbie Stoller. All pattern instructions reproduced for personal use.